Gradient Trails in Skia
Introduction
I came across this delightful animation recently after upgrading to macos sequoia in the maps app. Used to introduce custom routes, it features a path which animates along a loop. Since I am currently working on a maps project, I thought I wouldn’t mind a piece of that action.
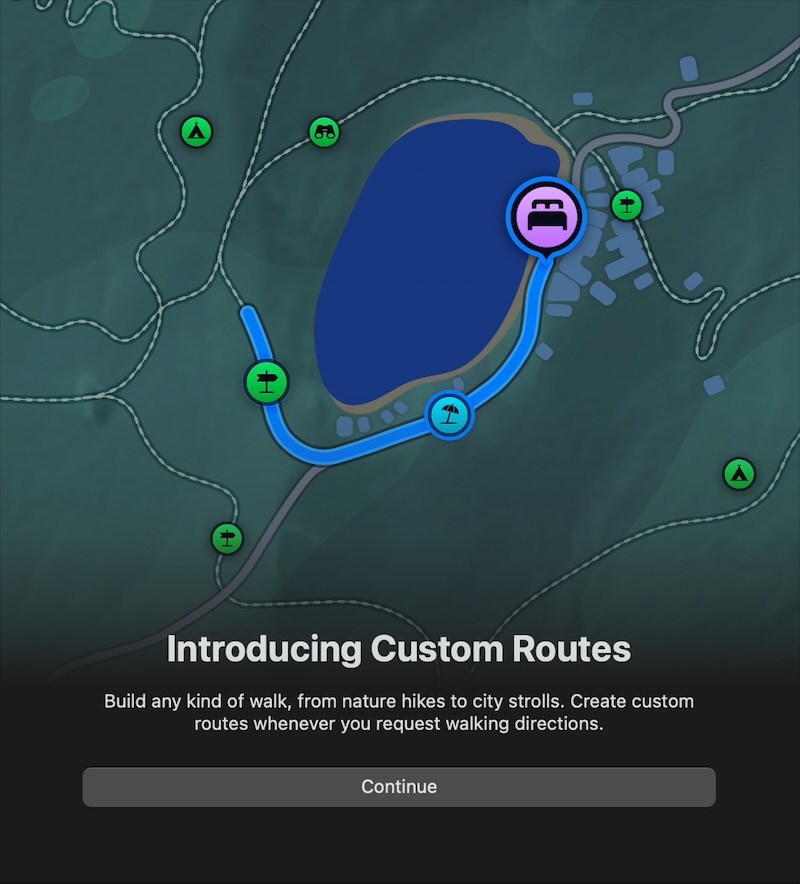
This excellent video by William Candillon - Gradient along a path with React Native Skia, was an excellent starting point for my exploration. Although now clearly outdated, it shows what is possible.
As well as a path animating its head from start to end, I also wanted to animate the tail so that it follows the path. Optionally with a nice gradient effect. If that wasn’t greedy enough, I also wanted to have the animation be able to loop endlessly, and have an arrow aligned correctly at the head of the path.
Skia Paths
Paths can take as arguments a start and end value, which ranges from 0 (the path start) to 1 (the path end). These values can of course be animated.
The ability to control the start and end of the path is key to the effect I want to achieve.
So getting the first outcome of animating the head of the path to the end is actually quite simple. Add a Reanimated withTiming hook, and done.
Having the tail follow the path can also be achieved the same way.
Wrapping the path
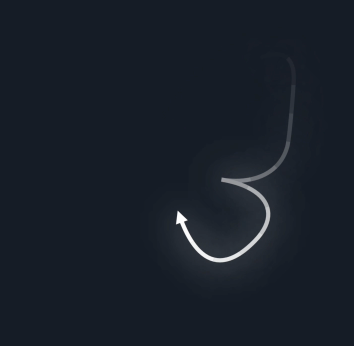
When it comes to having the trail wrap around a closed path, it is essential to have the tail follow the head. Otherwise, the trail will suddenly disappear once the head reaches the beginning again.
So for example, with the tail at position 0.6, and the head at position 0.9, it looks like this:

But when the animation advances, and the tail is at 0.8, the head will now be at 0.1. The head is now behind the tail. Skia does handle this inversion of start and end fine btw.

To overcome this, the path has to be split into two.
The two paths now go from 0.8 to 1.0, and 0.0 to 0.1.

This solves the problem of the trail wrapping, but it does introduce a new limitation. The tail can never be further than 0.5 from the head. Any greater than that, and the algorithm chooses the wrong direction, meaning that a you get a sudden jump in the animation - not great.
Trail fade effect
A staple of many space based games is the exhaust trail. Starting with a usually bright color, it eventually fades out to transparent over distance. This is also the technique of applying a gradient along a path.
Unfortunately, Skia does not support a gradient along a path. Interestingly, neither does SVG or CSS. It’s almost as if they are using the same rendering engine…
What we can do instead is to cut the path up into many sections, and apply an interpolated colour to each. If there are enough sections, you can get a passable gradient.
Since I have already had to cut the path into two sections to solve the wrapping problem, it wasn’t much more work to extend this.
In William’s original code, he uses a Drawing component to draw each of the sections.
Sadly, this Drawing component seems to be no longer part of the Skia library. So I tried another approach.
My TrailPath component takes an argument for the number of sections to use for the trail. It then renders as children a Path component for each section. It actually adds one more Path as well to cope with the wrapping.
...
<TrailPath sections={10} />
...
...
{pathSections.sections.map( (section, index) => (
  <Path start={section.start} end={section.end} color={section.color} />
))}
...
This means that there are no React re-renders when the path section count changes. When a section is not used, I set its opacity to 0.
All of the calculations for the section start and end values are done in the UI thread, and are passed as shared values to the React components.
The following images show the effect of increasing the number of sections. At 30 sections, the gradient is quite smooth.
3 sections 10 sections 30 sections


The head of the trail is controlled by using a withTiming/withRepeat hook, but the tail and also the section calculations are placed into a useFrameCallback hook. This is a hook which runs once per frame, so can probably be quite energy intensive.
These calculations could be placed into a useDerivedValue hook, which reacts to the head position only. But if the animation is continuous, there is not much benefit.
Animating every frame also allows me to have the tail eventually catch up with the head.
Head arrow
Adding an arrow to the head of the path was thankfully quite straightforward. Skia gives us a function called getPosTan which returns the coordinates and tangent of a point on the path.
I set up a useDerivedValue hook to react to the head position. Inside of this, I use the getPosTan function to get the position and tangent, then apply that to a matrix. This matrix is then set on a Group component which contains the arrow head geometry.
And with all of that, I have my first demo of a looping trail.
Path with gradient trail. And a bit of glow
Everyone loves a Boid
In order to showcase the trail effect, I started by creating a simple drawing tool. Using gestures to build up a path, which then fades out over time.
But then, wouldn’t it be more fun to have multiple trails bouncing around.
I tasked Claude to come up with a basic flocking algorithm, which it ably did. And then spent quite some time tweaking the parameters so it wasn’t completely rubbish, and also worklet’ising the whole thing so that it would run on the UI thread.
Out of the useBoids I get an array of objects each of which contains a position shared value (actually a makeMutable return value).
Another hook, usePaths, manages the trail paths. It contains three functions to start, update, and end a path. The paths are allocated as part of the hook initialisation. Whenever the start function is called, it takes an unused path from the preallocated array, and returns a reference to it. It also initialises a Skia Path object. The update function takes a position and modifies the Skia Path with the new coordinate, as well as updating the position and tangent of the head, so that the arrow can be drawn correctly.
So I have a dynamic array of positions, and a set of functions for drawing the trails. The trick is then connecting these two together.
The answer I came up with was to create a component which doesn’t actually render anything, but is able to host a useAnimatedReaction hook which reacts to the boid position. It calls the start, update, and end functions by using a primitive state machine around a single shared value.
As a bonus, it was also easy to pass in the path functions to a gesture handler, so that a trail can be drawn at the same time.
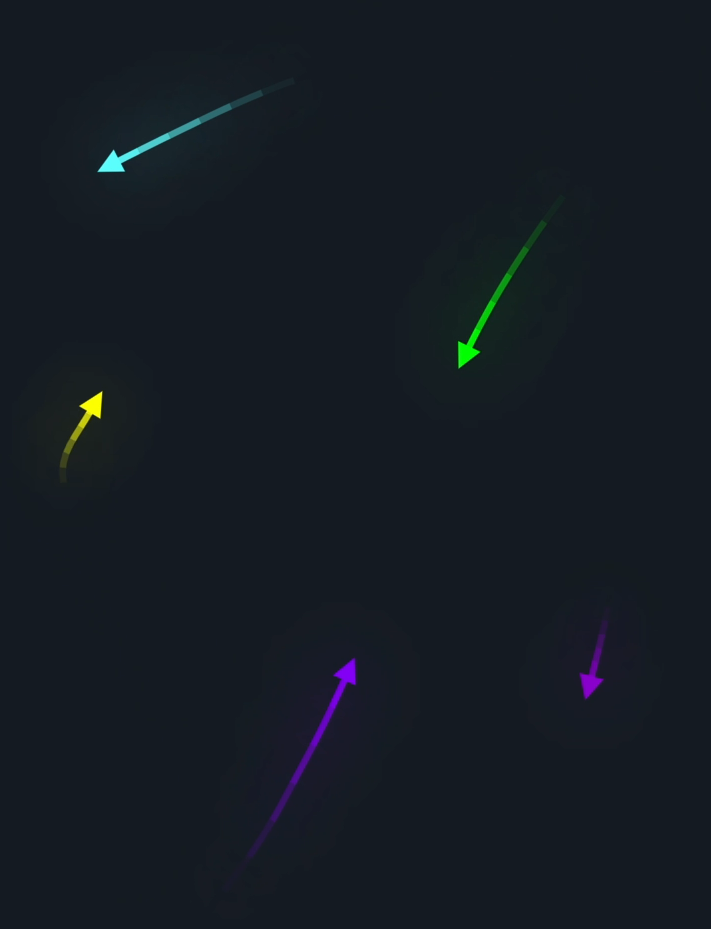
Trails flocking around
An aside on Reanimated Shared Values
It turns out that you can’t place a shared value inside of another shared value. I mean, you can, but the child value comes out malformed.
Given this contrived example
type Boid = {
  position: SharedValue<Position>;
}

const boidDetails = useSharedValue<Boid|null>(null);

useAnimatedReaction(
  () => cursor.value,
  (cursorValue) => {
    shared.value = {
      position: cursorValue
    }
  }
)
What happens then if you try and use boidDetails.value in a useDerivedValue hook is that you get this error:
ReanimatedError: sv.addListener is not a function (it is Object), js engine: reanimated
It turns out that the shared value looks like this:
{"_animation": null, "_isReanimatedSharedValue": true, "addListener": {}, "modify": {}, "removeListener": {}, "value": [155.0, 527.1]}
So while the value is there, the addListener property is not a function as it should be.
It took a fair amount of thinking to get around this limitation. Meshing the needs of a (preferably static) React component tree and the need of the UI thread values can be a bit thorny!
Closing thoughts
-
the (quite messy) code for this can be found here.
-
there are still some glitches in the trail wrapping. The head sometimes jumps a little after wrapping. Occasionally the entire trail will seem to invert.
-
Not terribly happy with the way trails have to have their length limited when following a wrapped path. Any greater than 0.5, and the algorithm chooses the wrong direction (as it is shorter), resulting in a sudden trail jump. A better way would be to start tracking ‘waypoints’ along the path, and move the tail to that.
-
Again, this could probably be done more efficiently using React Native WGPU (still unreleased). It should be possible to use a shader on a single trail geometry.
-
When you turn up the number of trails, the rendering performance drops quite noticably. This is especially clear in the boids demo. A further exercise would be to run the profiler and see where the bottlenecks are.
-
It turns out that CSS also does not have the capability to render a gradient along a path. This library allows you to do just that.
-
I think there is definitely a case for turning this into a library. Wouldn’t be too much of a stretch to do that. I would like to add a few more features to it such as specifying multiple colours for the trail gradient. I have attempted to jam every use case for a trail into a single component, but there is a good case to split these out.